Telemetry Demodulator Board Documentation
Last Updated: 05/16/99
Using the Board:
Input / Output Jacks:
The board has two RCA jacks. J1, marked "Output" connects up to the A/D Converter
board or other recording device. The default output is set for +- 5 volts maximum output for
a deviation of +-125 Hz of the carrier tone. This output can drive up to 100 feet of 50 or 75
ohm coax wire and loads down to 600 ohms.
The RCA jack J2, marked "Input" connects to your radio receiver. The input signal level
should be between 20 millivolts and 200 millivolts. Police scanners work very well as an
receiver for this board. The Squelch on the receiver so be turned all of the way off so that it
will not effect the output.
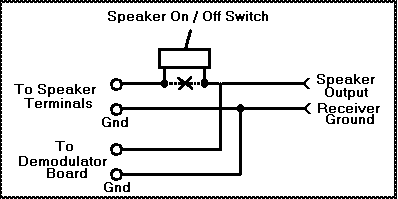
If your scanner does not have a external speaker jack you will need to open it up and attach
some wires across the speaker. PLEASE do this with the power off AND it may
effect the warranty etc. You will also want to attach a switch between the output wires and the
speaker. This way you can turn the speaker on and off and still supply a constant signal to the
demodulator board. Please see the diagram below:
Carrier Select:
The 8 position switch, SW1, sets the channel / tone to receive, see the table below:
	Switch #	Tone / Channel
	   1		    680 Hz
	   2		   1020 Hz
	   3		   1360 Hz
	   4		   1700 Hz
	   5		   2040 Hz
	   6		   2380 Hz
	   7		   2720 Hz
	   8		   3060 Hz
Note: Only one switch can be on at a time!
Low-Pass Filter:
The demodulator board uses a digital switched capacitor filter for low-pass filtering of the
signal. The cutoff frequency can be set by setting the jumpers on JP1, marked "Q Select",
using the following table:
	 Jumper     Cutoff Frequency
	1  2  4  8
	0  0  0  0     	Not Used
	1  0  0  0     	Not Used
	0  1  0  0     	50.0 Hz
	1  1  0  0	33.3 Hz
	0  0  1  0	25.0 Hz
	1  0  1  0	20.0 Hz
	0  1  1  0	16.6 Hz
	1  1  1  0	14.3 Hz
	0  0  0  1	12.5 Hz
	1  0  0  1	11.1 Hz
	0  1  0  1	10.0 Hz <-- Default 1 1 0 1 9.1 Hz 0 0 1 1 8.3 Hz 1 0 1 1 7.7 Hz 0 1 1 1 7.1 Hz 1 1 1 1 6.7 Hz Note: 1="Jumper" In 0="Jumper" out
Lock LED:
The lock LED (Light Emitting Diode) is used to indication that the demodulator board is
"Locked" to the carrier signal. It should be used when you are trying to find a sensor signal.
This indicator may turn on and off occasionally. If you do not see a "blip" in the data when
the LED turns on and off then the Phase Lock Loop (PLL) chip, used to demodulate the data,
is still locked. If you do see a "blip" in the data then the PLL chip is loosing sync with the
carrier. This can happen if the input signal level to the board is to little or to great. This can
also indicate that there is too much noise on the RF link.
Input Power Supply:
The demdulator board requires a power transformer that has a center tapped 24 to 26 volt AC
secondary output. It should have 300 milliamps, or more, of output current. The
transformers primary input needs to match the voltage, usually 110 or 220, and the frequency
of your local power company. The center tap wire of the transformer must go to the ground
plain solder hole, marked "24VAC2", The other two wires of the transformer should go to the
solder holes marked "24VAC1" and "24VAC3".
If you ordered the wall mounted power supply I have available, the center tap output is
marked "CT" and the other two outputs are marked with a "~".
General Operating Notes:
If you use the demodulator board with my 16 bit A/D converter card and
SDR, you should
set the "12 Bit Mode" to On for the channel that is connected to the demodulator board. This
setting can be found in the settings menu, Alt-1 to Alt-6 keys, for each channel. The
telemetry system does not have the dynamic range need for a 16 bit A/D convert. By setting
the "12 Bit Mode" to On you will be saving disk space buy not saving the lower 4 bits of the
16 bit data.
[ Back ] [ Home Page ]
Larry Cochrane - www.seismicnet.com/contact.html