Contents:
The Remote File Request feature is used to send email request to PSN stations
for event files or station information. The event files, or station information,
are returned as email messages from the remote station(s). WinQuake does not directly
receive the event files or station information. The event files or station
information are saved to disk using the users email program like Outlook Express
or Eudora and then loaded by WinQuake.
The following dialog boxes are used to control the Remote File Request
feature.
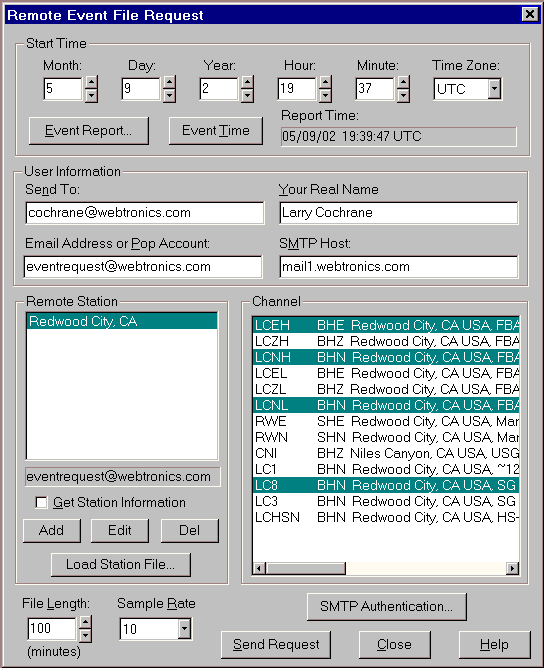
This dialog box is used to send requests for event file(s) or
station information to one or more remote stations.
Start Time Group:
Start Time Month / Day / Year / Hour/ Minute Edit Boxes:
Enter the event file start time.
Start Time Select Box:
Select UTC or Local Time for the event file start time.
Event Report Button:
Opens the Event Report dialog box so that a event
report time can be used for the event file start time.
Event Time Button:
Enters the currently selected event report time, minus two minutes, in the
Start Time Edit boxes. This button will be dimmed if no event report is
currently selected.
Event Report Time Text:
Displays the currently selected event report time.
User Information Group:
Send To Edit Box:
Enter the email addresses that the remote station will used to send the event files or station
information too.
Input Example: jsmith@somehost.com
Your Real Name Edit Box:
Enter your real name. This string is used as part of the From: field of your message.
Email Address or POP Account Edit Box:
Enter your return email address. Some SMTP Host servers may require that this address
be the same as your POP account address.
Input Example: someone@ahost.com
SMTP Host Edit Box:
Enter your ISP's SMTP host name or IP address.
Input Example: mail.myisp.com
Remote Station Group:
List Box:
Use this list box to select one or more remote stations that will receive your
event file or station information request.
Email Address Display:
Displays the email address of the current selected station.
Get Station Information Check Box:
If checked, the remote station will respond with information about each of the
stations' sensor channel(s). The returned email message should be saved as a
text file and then loaded using the Load File button in the Remote
Station Information dialog box.
Add Button:
Opens the Remote Station Information
dialog box. Used to add a new remote station and channel information.
Edit Button:
Opens the Remote Station Information
dialog box. Used to modified the information of a remote station.
Del Button:
Deletes the current station.
Load Station File Button:
Reads a PSN Station database file to update the Remote Station list box
with new station information. The current PSN database file can be downloaded
from here. After
unzipping the database file use the Windows Open File dialog box to locate and
open the file.
Channel List Box:
This list box displays all of the sensor channels selected in the Station list
box. Event files will be requested for all of the channels selected in this
list box.
File Length Edit Box:
Enter the file length in minutes of the event file(s). The actual
file length will depend on the sample rate (SPS):
    200 or 100 SPS = 1 Hour
            50 SPS = 2 Hours
      20 or 25 SPS = 4 Hours
            10 SPS = 8 Hours
             5 SPS = 12 Hours
             1 SPS = 24 Hours
Sample Rate Select Box:
Select the sample rate of the event file(s).
SMTP Authentication Button:
Opens the SMTP Authentication dialog box. Some ISP require user authentication
to use their SMTP server. If authentication is required, use the SMTP Authentication
dialog box to specify the authentication type, user name and password.
Authentication information is saved in the remote.dat file.
Send Request Button:
Sends the request the the selected stations.
Close Button:
Closes the dialog box.
Help Button:
Opens this documentation.
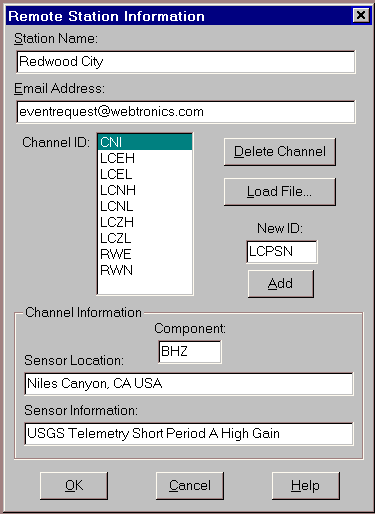
This dialog box is used to add or modify remote station
information. It is
also used to add or modify remote station sensor information.
Station Name Edit Box:
Enter the station name in this edit box.
Email Address:
Enter the email address of the remote station in this edit box. Only the email address
should be placed in this field. Example: psnstation@somedomain.com
Channel ID List Box:
This list box displays the sensor channel IDs at the remote station. The
Channel Information edit boxes will display additional information for the selected channel.
Delete Channel Button:
Deletes the current selected channel in the Channel ID list box.
Load File Button:
This button is used to load a station information file. If the users sends a Get
Station Information (see the dialog box above) request, the station will
send back a station information email message. This email message should be
saved as a text file and loaded using the Open File dialog box that is opened
when this button is pressed. WinQuake will read this file and add the channel
information contained in the file.
New Id Edit Box and Add Button:
Used to add a new channel ID to the Channel list. After entering the channel
ID, and optional Component, Sensor Location and Sensor Information the user
should press the Add button to add the new information.
Channel Information Group:
These edit boxes are used to add additional information about the sensor
channel.
Component Edit Box:
Used to enter or modified the Sensor Component string.
Sensor Location Edit Box:
Used to enter or modified the Sensor Location string.
Sensor Information Edit Box:
Used to enter or modified the Sensor Information string.
Ok Button:
Closes the dialog box. Information added or modified will be used by WinQuake
and saved in the
remote.dat file.
Cancel Button:
Closes the dialog box. Information added or modified will not be used by
WinQuake.
Help Button:
Opens this documentation.
[ Top ] [ Next ]
[ Previous ] [ WinQuake Help ]